Tuesday, June 4, 2013

No-Sew Lightweight Cardigan

It's difficult to believe that just the other day I was so cold, I decided to make a quick little sweater. But it's true and I have the cardigan to prove it. I started with an old tee shirt that I had only worn once due to the way it fit. Loved the pattern on it, but, well you know how it is sometimes... Anyway, since the tee shirt matched the outfit I was wearing,


so onto the cutting table it went. This is where I often hesitate and have to remind myself that it wasn't getting worn anyway, so I have nothing to lose.


Down the center front went my trusty scissors, and the transformation was halfway done. No turning back now.


Next, I chopped off the neck band.


And voila! My new, 3/4 sleeve closet basic was born. I later decided to cut off the "lapels" seen here, but altogether this little number took me about 5 minutes to create. Looks great with my little black sundress, too. Love it when a plan comes together.

Wednesday, May 15, 2013

REZRAGZ is Born

I have always gotten a kick out of taking a discarded, worthless piece of "junk" and recreating it into something of use or beauty. (Reminds me a bit of my own life, only I didn't do the recreating.) Of course, now this pastime is a politically correct. Green, even. So recently the Jazzercise Instructor (JI) and I have been getting together on Tuesdays re-making old tee-shirts into wearable art. Thought you might be interested in yesterday's pieces. The JI made this burgundy dolman-sleeved top from an  XL tee-shirt based on this tutorial Dolman Tee-Shirt.
Very easy and very cool! She also made a long blue skirt and obie-tie belt from an XXXL tee-shirt and a cowl-necked dress from a powder blue tee. You'll have to take my word for it though, because we forgot to take photos. We'll do better next Tuesday, I promise.

I took a discarded black shirt I had bleach tie dyed for the Professor a few years ago. Because I neglected to rinse the shirt after discharging it, the fabric continued to degrade. (Note to self: rinse all discharged items in a solution to stop  discharge action!)

Because the shirt had a few tiny holes, I figured I could experiment. So I copied a shirt that fit beautifully, adding seam allowances as I cut the shirt apart.
Ver
Voila! New, fun casual shirt to wear to the blues festival this year.

Anyway, the JI and I got these fantastic labels for our creations at Custom Labels.We may even start a Facebook page, who knows.

Monday, May 13, 2013

Mind Mapping

There is something great about beginning the week with a creative project among friends. This afternoon at Creative Playtime, we did a little mind mapping. Now if you're not familiar with this activity, give it a try after you read through today's blog post. First we prepared the background. Using a partially wet (spritzed with water) sheet of sketch paper. Onto that was layered color with Derwent's Inktense Color blocks. These wonderful sticks of pure color go on like watercolor pencils, but the colors are richer, brighter. And once the ink has been wet and dried, the color becomes permanent. Great for layering more color or glue or any wet media. No running or smearing. These may be my new favorite tool.

Look at these backgrounds. We set them aside to dry while we rummaged through the collage items to fill our pre-cut heads.
  The heads were covered with the collage materials and then attached to the dried backgrounds.

Next week we're planning to do aprons to protect our clothes from paint splashes. Stay tuned!

Thursday, May 9, 2013

Needle-Felted Journal Cover

Monday afternoon a longtime goal was realized. I started meeting with some girls on a regular schedule to do art. I put together a sample project for inspiration
and we made it. I'm calling the group Creative Playtime. This week we needle felted journal covers.

We started with an 8x10 piece of wool onto which we felted wool roving, wool scraps and various yarns. By using a barbed needle to push fiber through the wool, they are joined 
creating a single piece of fiber.
 
After the design is felted onto the wool, the wool was then attached to an 8x10 piece of matboard with one of my favorite iron-on products: Wonder-Under.

 
After affixing the wool to the matboard,  words were stamped onto the cover
 
and dots were added with permanent Sharpie markers and gel pens.
With the final addition of wire binding by my Zutter binding system, the journal was completed.
Can't wait for next week's Creative Playtime.


Wednesday, May 8, 2013

Choosing Color BHG Style

My sister, the Fashionista, was here this past weekend. We wandered the Farmer's Market, bought fiber art at a garage sale. We ate at the local Co-Op, went home and planted the pink and white Cosmos she bought me there.
We stopped and smelled the flowers everywhere we went. We stayed up late cocooned in blankets on the fire-lit  patio. We shared inspiration and encouraged each other to live fully awake and alive. It was grand.
The last night we were together, I pulled out a sketchbook of sample color studies from my school days as we considered the possibility of designing a room inspired by the peony blossoms she had carried home from the Farmer's Market.
The bright pink set off by the yellow center pierced by pale green on a stem adorned with dark green leaves. We imagined pale green walls, a neutral couch in white loaded with pillows of bright pink or a pale yellow couch with pink and white and pale green pillows and dark green carpet... The choices went on and on. Great fun exploring the options.

After she left, I got my weekly BHG.com email which had some interesting information about using color in decorating. Thought it might be helpful to share it with you, too. Check out the link.  Tips and Tricks for Using Color I'd love to hear what you think.

And by the way, she loved the skirt!

Tuesday, April 30, 2013

Design Elements in Red

My one and only sister is a physically fit, stylishly-dressed woman who could easily pass for an older sister to either of her two grown daughters. Her career in the fashion industry keeps her style sense current. She and her husband are coming from Phoenix to hear the Professor's band, Half Throttle, play at the Main Street Bar & Grill on Saturday. Should be good times.

I love it when she comes because I  get my hair trimmed, slap polish on my toenails if the season calls for it and give my house a thorough cleaning, not necessarily in that order. Procrastinating this morning, I decided instead to make her a little gift. Her signature color is a bright coral-red. A few months ago I found 2 gently-used and 3 brand-new tee shirts in her color at Goodwill. I had planned then to put them together into a skirt for her. So today, rather than fill the house with the smell of a pedicure or cleaning supplies, I pulled out my shiny, new serger and cut up tee shirts.

After cutting these 2 apart, I realized they were not as fine a knit as the other 3 solid colored ones. Fodder for another project.

I had removed the glitter-decorated section from the fronts of the other 3 shirts and washed them months ago. Today, setting aside the detached sleeves, I cut the remaining body of each shirt into 3 of the 4 pieces needed before realizing I didn't have enough fabric left to make the skirt! I nearly gave up at this point until remembering the 6 detached sleeves piled beside the serger. Piecing these long sleeves together, I created enough fabric to cut another piece for the skirt front and the waistband.
Here is the finished "reversible" skirt.
 Did I mention that I'd never previously made anything with my serger?
Notice the interesting design lines created by my need to piece fabric.  I often say that mistakes and lack are often the place where creativity is born. Today that was certainly the case.

And here's what the other side looks like. I'll let you know how my sister liked it.

Monday, April 29, 2013

Artful Briefcase

This unique, hand-painted briefcase up-cycle has been simmering in my mind for quite a while. Today's sunshine lured me out of the studio armed with an old briefcase,  masking tape, extra fine grit sandpaper, a clean rag and some rubbing alcohol. First I taped off the area I planned to decorate.
Once the section of the case was taped off, I took a fine grit sanding paper to the taped off area. I didn't have a really fine grit sandpaper, but I used the finest I had to rough up the surface of the briefcase. The point here was to rough up the surface and give it more tooth to hold the paint.
Once I had sufficiently roughed it up, I carefully wiped it with a clean cloth soaked with Rubbing Alcohol to remove any remaining finish I might have missed while I was sanding.
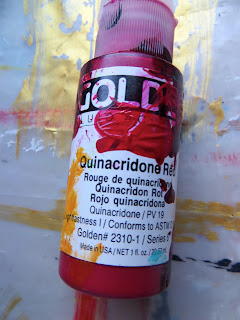
Next pre-painting the area. Mix equal parts of water and paint. I used a mixture of Primary Cyan and water with a couple of drops of Carbon Black.
Apply the watered down paint to the taped off area. Do not let each coat dry completely before adding the next coat.
These layers of paint (I used 3) will appear streaky and should be moved and creased as they dry in order to keep the paint from cracking.
After the third coat, I added the first coat of undiluted paint, using Golden Quinacridone Red fluid acrylic.
After this coat was completely dry, I added a second coat and allowed this to dry completely as well.
Then came the final designs. A few silver and black lines and a peaceful face were added.  This briefcase will be available in my Etsy Store if you're interested.

Friday, April 19, 2013

Share the Love

Found this article on information about love and connection interesting. Check it out:
Ten Things You Might Not Know about Love

Be careful, you might learn something!

Tuesday, March 19, 2013

Seeing Life with New Eyes

About a year ago I happened upon an inspiring online club offering courses to improve self image, goal setting, body image and other topics. I was entranced by the encouragement and wisdom I found and quickly became a part of the Brave Girl's Club Community.

Found this story today written by one of the founders of Brave Girl's Club, Melody Ross. Thought it worth sharing.


Enough procrastinating. Guess I'd better get back to the packing. Enjoy the view in your life today!

Thursday, March 14, 2013

Procrastination Habits

I like thinking about change, planning for change, talking about making changes. I enjoy the idea of changing. But when it comes right down to actually making a change, I get side-tracked. Instead of meeting the change head on, I find myself dreaming up a class to teach or beginning a new project.

I'll give you an example. When the time came to step out of my comfort zone and promote paintings, greeting cards and ARTformation Cards, I turned to sewing. When the sewing projects approached completion, I began needle felting an old wool coat.


I end up with some lovely projects, but the first task doesn't get done in a timely fashion.

The Professor and I are currently planning to move from the idyllic condo we have called home for the past 6 years. Sadly, I seem to be up to my old tricks of procrastination. Rather than packing our life  into the stacks of boxes it will take to move us to our next location,
I contacted a local store about selling my ARTformations and line of inspirational greeting cards.

And wrote this post.